If you are like us, your Android devices go with you pretty much wherever you go. And they hold all sorts of personal information that would be embarrassing at the very least if it were to get into the wrong hands. It behooves all of us to do what we can to make sure our Android devices are as secure and private as possible. That's the goal of this guide.
We think it is important to get your Android device secured quickly. But getting your device locked down tight isn't a five minute job. So we're starting with fast and easy stuff. We've also tried to put the steps in a logical order where possible.
This way, even if you only have five minutes to spend right now, you can improve your privacy and security on Android in a few simple steps. Whenever you have some time, come back to this post and complete the next steps. Completing all the steps is the goal, but every step you complete adds to your online security and privacy.
Here are the steps we are going to discuss in this Android privacy and security guide:
- Set a screen lock
- Use those Privacy settings
- Eliminate excess
- Install security apps
- Make privacy-friendly apps your default apps
- Maintain security by doing these things
We’ll also touch on replacing Android with a version that doesn’t report everything you do to Google, for the ultimate boost in security and privacy.
Note: For this guide, I used a Samsung S9+ running Android 10. The instructions you see here should more or less apply to your device. However, each new version of Android varies, particularly where specific settings are found. And each device manufacturer makes their own tweaks to the operating system. The upshot of all this is that we can almost guarantee that some screens will look different on your device, and some settings will be located in different places. But we’ll keep this guide updated with best practices now and for future versions of Android.
1. Set a screen lock
If you haven’t already done so, setting a screen lock is the fastest and easiest way to boost the security of your Android device. While we haven’t seen any recent studies on the subject, it appears that there are still a lot of folks out there who don’t bother to lock their Android devices at all. If this describes you, realize that anyone getting their hands on your device will have complete access to all that good bank account data, and all your photos, documents, and more. Why not take the plunge and set up a screen lock?
Follow these steps to set a screen lock:
- Open Settings on your device.
- Tap Privacy.
- Tap Lock Screen.
- Tap Screen Lock Type.
- Select one of the screen lock types offered by your device. Android helpfully classifies each option by the level of security it provides:
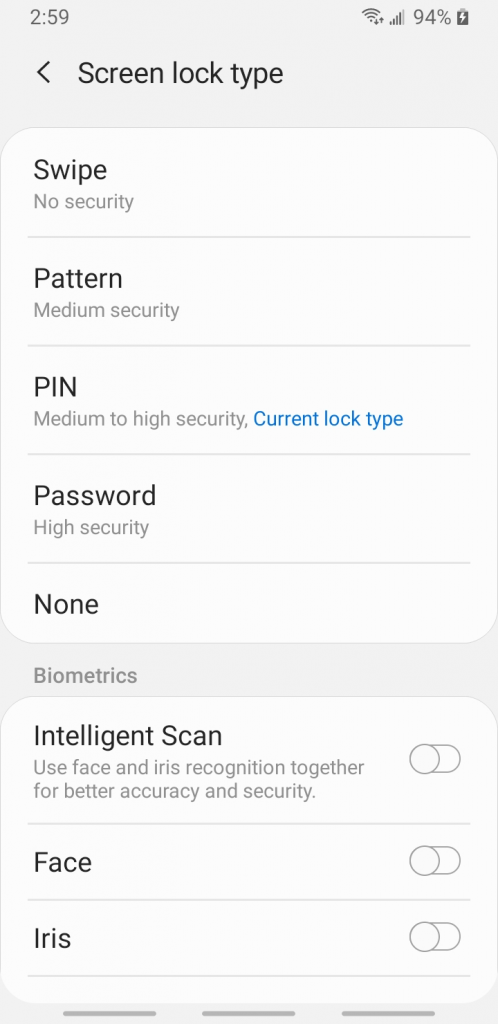
While using one of the biometric options is much more fun, we recommend you go with the old-fashioned PIN or Password options. Why? No matter what option you use to lock your device, data for that option ends up stored somewhere. And if data is stored somewhere, it could potentially get stolen. If the worst happens and your PIN or Password get stolen, you can easily change them. What are you going to do if your fingerprint or Iris scan get stolen?
You’ve made your Android device much more secure in a matter of seconds. Now just make sure you don’t forget your PIN or Password!
2. Use those Privacy settings!
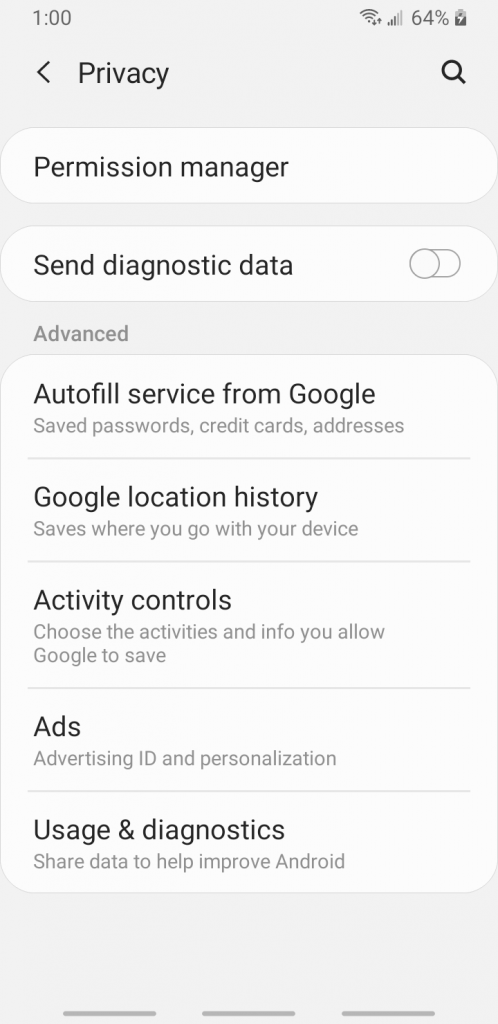
Android devices give you various ways to improve your privacy. But finding them has typically been a headache, as the options were scattered throughout the system. In Android 10, Google partially addressed that problem by putting a number of its main privacy settings together. Not surprisingly, you get access to them in the Privacy section of Settings.
Unfortunately, this still isn’t an all-in-one control center for privacy-related settings. For example, the Autofill service from Google option doesn’t actually let you turn Autofill on or off. It simply shows you what Autofill data Google has stored in your account. You’ll have to go to a different location to control Autofill. Further complicating things, not all the settings are available on all devices, and versions of Android earlier than 10 don’t include this section at all.
That all said, what we are going to do is look at the Privacy settings available on my Samsung S9+, and show you how to adjust them for maximum privacy. From each setting’s starting point here, we’ll be jumping all over the place, but such is the state of privacy settings on even the newest Android devices.
We’re going to be coming back here a lot over the next few sections, so memorize these steps to return to the Privacy settings:
- Open Settings.
- Tap Privacy.
You’ll be doing it in your sleep before we are done. Here we go.
Permission manager
Android apps often need access to specific aspects of your device or the operating system. For example, the Voice Recorder needs access to the device's microphone. This only makes sense.
But things can get murky fast. For example, did you know that many third-party flashlight apps request access to things like your location and contacts? Why, exactly, does a flashlight app need access to either of those things? Answer: It doesn't, but selling your location data to advertisers can be profitable. (We'll address this more below.)
Even in less-dubious situations, you might want the ability to disable certain permissions. Say you use Skype, but only for text massages. Does Skype really need access to your microphone in this case?
Then there are automatic permissions. Google has decided that some permissions are so essential that every app is granted them automatically. In particular, all apps are granted Internet access automatically. If you look through the Permissions settings, you will notice that there isn't even an option to see which apps have Internet access, much less to deny that permission.
This makes it all the more critical to eliminate unneeded app permissions wherever possible. That new game you installed might be guaranteed access to the Internet for sending and receiving messages, but if you deny it access to any critical data you can at least minimize the risk that it will send your personal information to some hacker in who-knows-where. Turning off permissions like this just makes sense from the privacy perspective. Android now gives you the option to enable and disable app permissions all in one place, the Permission manager.
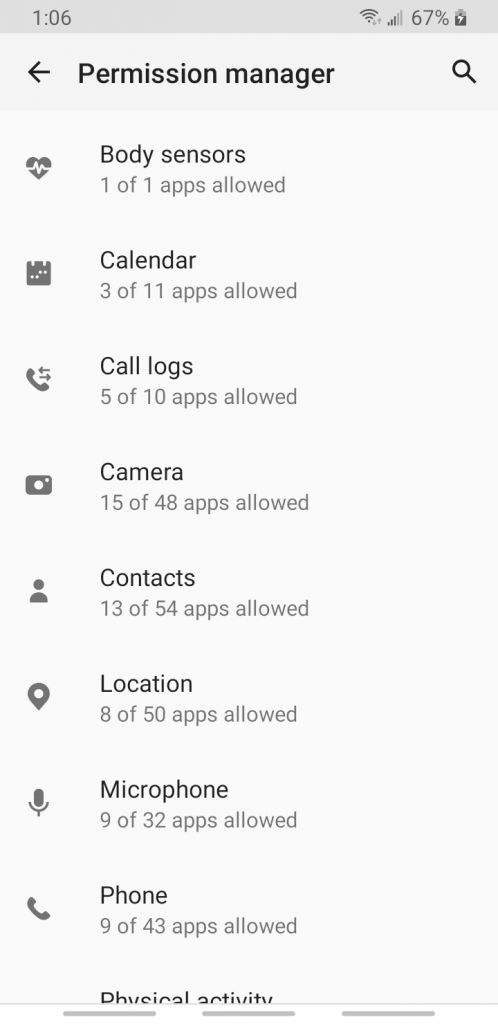
Tap one of the options here and you will see which apps have permission to use that particular option and which do not. Tap an app's name and you can change its permission for that particular option.
Examining the permissions that apps have on your device can be enlightening. For example, when I tap Calendar, I see that three apps have permission to look at my Calendar data. The Android Auto app, Calendar app, and Email app have permission to do so right now. The Calendar app makes sense to me. But I don't use the default email app, so why should it have permission to see my Calendar data? Likewise, Android Auto is a car navigation app. I'm not sure why it would need access to my Calendar data.
Given that background, here are the steps to control app permissions:
- Go to the Privacy settings, then tap Permission manager. You can now see each option, along with how many apps are allowed access to them out of how many have requested access. In this example, three apps out of 11 have permission to see my Calendar data.

- Tapping Calendar shows me exactly which apps do and don't have access to this data.
- Tapping Email (one of the apps I do not want to have access to this data allows me to set the permission:
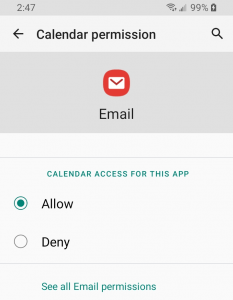
- I can choose to set the Email apps access to the Calendar data here. Depending on what you decide to do, Android may warn you about some negative impact of the change you are about to make. You'll have to decide whether or not to heed that warning.
It is worth looking through all the options at least once to see if there are any apps with permissions you don't want them to have. You might be surprised what you see.
Note: As you can see in the preceding image, you may see a link that will let you see the status of all the permissions the current app has requested. This can be particularly useful after adding a new app as it gives you a quick way to check the permissions your new app has.
Send diagnostic data?
The next thing you might see on the Privacy settings screen is an option to send diagnostic data to the phone manufacturer. Tapping this option pops up a message explaining why you should let your device send unspecified types and amounts of data to the phone manufacturer for, “improving our products and services.” As the saying goes, just say NO. Sending this data to the manufacturer is optional, so say no to this voluntary privacy leak. Here's how:
- Go to the Privacy settings, and look for a Send diagnostic data option.
- Make sure that the slider for this is set to Off.
That's it. Super simple.
Advanced settings
There are a number of “advanced” privacy settings you can control as well. These may be visible on the Privacy settings screen, or you may need to tap Advanced to see them.
Autofill with Google
If you save things like credit card data on your Android device, that data ends up stored in your main Google account. Autofill with Google (this setting may also be called Autofill service from Google) lets you see what data you have stored in your Google account, and delete it if you wish. If you must store your personal data online, there are much better ways of doing it. So let's see how you can delete any such data you have stored with Google:
- Go to the Privacy settings, and tap Autofill with Google. You'll see a screen something like this:
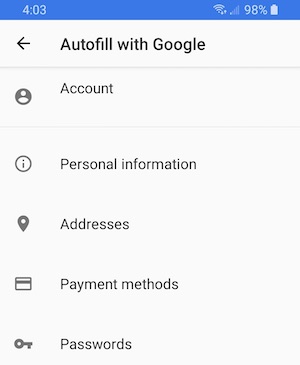
- Tap each of the options to see what data Google has stored under it. You will need to look around a bit in each area to find out how to edit or delete the data that Google has. You may be shocked at how much there is. I was.
For now we will keep working on the Privacy settings. Later in this post, we'll talk about a better way to keep all the personal information you want stored securely online where you can easily access it but no one else (including Google) has access to it.
Shut down Location History
Android devices are constantly trying to figure out where they are in the world. Even if you aren’t using any services that track your location, Android does so. It then will upload that information to Google to store in your Google account. The company uses that data to send you personalized maps and recommendations – and probably for targeted ads, too.
If you don’t like the idea of Google keeping a record of everywhere you go, at the very least you will want to shut down Google Location History. Location History is a timeline that shows everywhere you have been with your device.
Note that Location History access to your position is independent of the Location permissions we worked with in the Permission manager.
By pausing Location History, we can stop Google from tracking us as we move about. This won’t keep apps from using location information from your device (there are other options for controlling that), but it will stop Google from filling up up their databases with a detailed profile of where we go in our day-to-day lives.
To pause Location History, follow these steps:
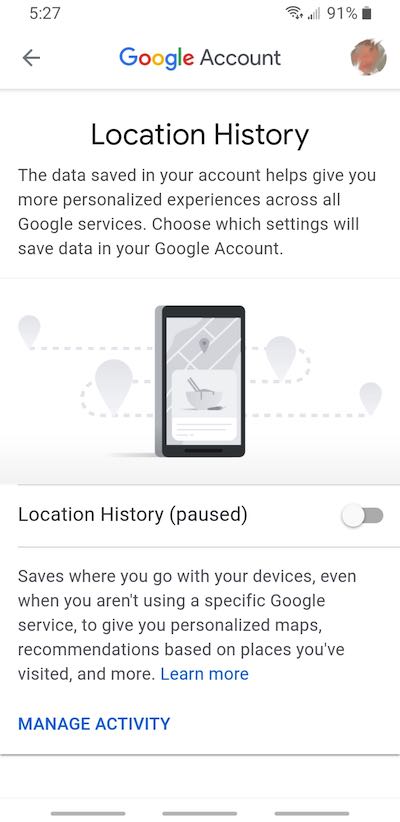
- Go to the Privacy settings, then tap Google location history. This takes you to the Location History page of your Google account.
- Ensure that Location History is paused, as shown here.
Reduce snooping with Activity Controls
Next up is Activity Controls. For anyone who wants to protect their online privacy, the intro to this section of Privacy settings is scary indeed:
The data saved in your account helps give you more personalized experiences across all Google services.
In other words, Google tracks everything you do, and uses that data to predict what you will do next, influence what you think and do, and serve you targeted ads that are designed to convince you to buy stuff.
Let’s turn all this off now:
- Go to the Privacy settings, then tap Activity Controls. You’ll see a screen full of the kinds of things that Google tracks, along with a pitch on why them tracking this information is good for you.
- Turn off Web & App Activity. Google will give you a long message trying to convince you to let them keep tracking you. You should be aware that doing this doesn’t actually put an end to Google collecting this data. It only pauses the collection.
- You should also know that doing this will not delete all the data Google has already collected on you. To delete the data Google has already collected in the Web & App Activity category you need to go to myactivity.google.com.
- Now go back to the Activity Controls screen and do the same process to pause Location History.
- Repeat for YouTube History.
Ignore the bit about Ad personalization that may appear next on Activity Controls. We will deal with that in a moment in another area.
Put an end to Ad personalization
Google uses data it collects about you to offer personalized ads. Part of this is assigning you a personal advertising ID that they use to accumulate data about you. We can turn that off too. At least, tell apps not to use that ID to build profiles or show you personalized ads.
- Go to the Privacy settings, then tap Ads.
- In the screen that appears be careful to turn On the slider to Opt out of Ads Personalization. If you leave the slider in the Off position you are telling Google to continue to apply Ads personalization.
Note: If you disable Ads personalization you will still be forced to see ads (we will fix that later) but they won’t be customized for maximum impact on you. In addition, if you clear your cache, it will automatically turn Ads personalization back on.
Usage & diagnostics
This setting tries to get you to share even more data with Google to help improve your Android experience. We suggest you turn this off too.
- Go to the Privacy settings, then tap Usage & diagnostics. You’ll see a screen full of reasons why you should allow Google to collect this data. Just turn it Off.
3. Eliminate excess
Sometimes the problem isn’t that you have or do something; it is having or doing too much. In this section we will cover three things that you can have in excess on your Android device. The first is excess apps.
Delete excess apps from your device
We need to install apps to make our Android devices useful. However, we often end up with apps on our devices that we seldom (or never) use, and don’t really need. The problem isn’t that these apps use up too much space, or slow down your device. Modern devices have lots of memory and processing power to support all these apps.
The problem is that every app that exists on your device is a potential privacy and security problem. In the last section we talked about how Google automatically grants every app permission to use the Internet. This means that every single app on your device has the potential to:
- Send any data it can get its hands on to points unknown somewhere on the Internet
- Receive “stuff” from the outside world that could affect your device
Think back to the flashlight apps that want access to your contacts as an example. It is hard to see why a flashlight app would need access to your contacts. But combine that with automatic Internet access, and things start to make sense. Your contact list is valuable, and can be sold without your knowledge to advertisers, or otherwise misused.
You get the point. You can improve the security and privacy of any Android device by removing any app that you don’t absolutely need.
Here’s how to remove those excess apps:
- Tap Settings, then Apps. You should see a list of the apps on your device.
- Tap an app you don’t absolutely need to have on your device. You’ll see something like this:
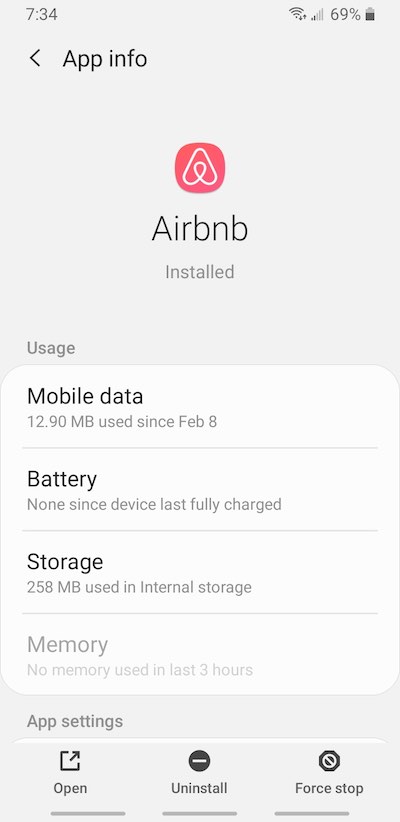
- Tap Uninstall. Android will pop up a message asking you to confirm that you want to uninstall the app.
- Tap OK to uninstall the app.
- Repeat for each app you can live without.
Deny apps excess permissions
Once you reduced the number of apps on your device to the absolute minimum, it is time to use the Permission manager (if you haven’t already done so) to ensure that the apps that remain on your device only have the permissions they actually need to do their jobs.
End excess cloud syncing
More and more apps now offer the ability to sync their data to the cloud. This can be useful, particularly for messaging apps (which tend to generate a lot of data over time) and for apps that store important data (like your contacts or credit card information). However, data you sync to cloud storage is a target for hackers. And any data synced to cloud storage by the default Google apps is likely to be read and analyzed by Google.
As with excess apps, and excess app permissions, it is best to cut cloud syncing to the absolute minimum. Only let an app sync to cloud storage if it is absolutely critical to you that the data gets stored up there. Here’s how you disable cloud sync for apps that don’t require it:
- Tap Settings, then Accounts (this may also be called Accounts & backup or something similar).
- Tap Accounts to see a list of the apps that are currently syncing data to cloud storage for one purpose or other.
- Scroll to the bottom of the screen to see the Auto sync data slider. Turn this Off to prevent any app from syncing automatically.
- Alternately, you can tap individual apps to turn cloud sync on or off for that specific app.
- Go back to the Accounts and backup screen. Some devices will have backup and restore options here. These control whether and where general data from your device is backed up. Allowing this to happen can be helpful in case of problems, but remember that any data stored in the cloud this way (by default Google or device manufacturer apps) is a potential security and privacy problem.
Note: There are many privacy-focused cloud storage options, such as Tresorit and Sync.com. This will offer more privacy and control over your data than Google Drive. Check out our best cloud storage guide for the latest recommendations.
If your Android device doesn’t already have security apps of some kind installed on it, you really should consider installing them now. Android viruses and spyware are a growing problem, but one that is easy to protect against.
But before you go looking for security apps, realize that your device may already be protected. First off, Google Play Protect is a Google Play store feature that automatically scans your apps and your device for problems. It will notify you if it finds anything. Unfortunately, relying solely on Play Protect isn’t enough.
One reason you don’t want to rely solely on Play Protect is that it is a Google product. That means it will protect you against any threats, except Google itself. Remember that Google wants to collect every bit of information about you that it possibly can. Expecting Google Play Protect to protect you against Google is like expecting a fox to guard the henhouse.
Second, you may someday want to install apps on your device that do not come from the Google Play store. Google Play Protect is unlikely to protect apps that didn’t come from its store.
Leaving aside Play Protect, some device vendors ship their products with antivirus/anti-malware apps already installed. My Samsung phone came with a security app from McAfee pre-installed.
But if your device doesn’t have any security apps installed, you may want to install one. There are free apps out there, but it is hard to know whether you can trust them or not. As Sven explained last year in the Antivirus privacy guide,
Many antivirus products behave in a way that infringes on users’ privacy. Whether they intercept web traffic, sell browser history data, or allow backdoor access to government agencies, many antivirus products are guilty of jeopardizing the very thing they are designed to protect: your data.
Generally speaking, we don’t devote much time to testing antivirus/anti-malware apps as we are mainly focused on privacy tools. However, one option that has performed well in third-party testing and also respects your privacy is Emsisoft. Emsisoft offers a lightweight Android antivirus solution called “Emsisoft Mobile Security”.
5. Make privacy-friendly apps your default apps
Android has a few default apps. These are apps that, for example, open automatically when you click a link on a page. There aren’t many such apps, but you can easily replace them if you wish. Here are instructions on how to do that.
While you can change any of the default apps, the most important one to change is the default Browser app. Google’s browsers are fast and work on virtually any site. Unfortunately, they also report everything you do directly to Google.
We suggest that you check out this review of Private and Secure Browsers and choose a new one to become your default browser app. Once you’ve made your decision, and installed your preferred browser app on your device, follow these steps to replace the default Browser app with a new, privacy-friendly one:
- Tap Settings, then Apps.
- On the Apps screen, tap the three-dot menu on the top right.
- In the menu that appears, tap Default Apps. You’ll see a handful of default apps on the page that appears.
- Tap Browser app. Android will display a list of the browser apps you have installed on your device.
- Tap the browser you want to use as the default (Brave in this case). That’s it!
Block ads, tracking, and malware
Once you have a new web browser installed and set as the default app, consider powering it up a bit. There are a few browser extensions or add-ons that can help shield your Android device from ads, tracking software, malware, and malvertising. In addition, some browsers now have protection against some of these problems built right into the app. The options you will have available depend on the browser app you choose. Firefox, for example, has protection against trackers built in. And uBlock Origin is a Firefox add-on that can block a wide range of ads as well as malware domains.
Note: We also have a guide on how to modify Firefox for more privacy.
Another great option is to use a VPN with ad blocking. We'll talk more about VPNs below, but a VPN ad blocker offers these advantages:
- It is more efficient with blocking ads than browser extensions
- It is easy to use and can block ads on your entire Android device (all browsers)
- It is more powerful than most other mobile ad blockers
Take advantage of the built-in settings and available add-ons for whichever browser you decide to use, and browse more safely and securely.
Download apps from safe sources
From time to time, you may be exposed to interesting-looking apps that do not come from the Google Play store or your device manufacturer’s app store. Downloading apps from such sources is almost always a bad idea. Google and the device manufacturers try to keep their stores clean. That is, they do what they can to weed out third-party apps that are malware or spyware. They may not be very good at it, but they apparently try.
Sources beyond these can be very risky. Even with the best intentions, they generally don’t have the resources to keep bad apps at bay. With one major exception: F-Droid.
F-Droid for Android apps
What is F-Droid? Here’s how they describe themselves:
F-Droid is an installable catalogue of FOSS (Free and Open Source Software) applications for the Android platform. The client makes it easy to browse, install, and keep track of updates on your device.
In other words, it is an alternative to the Google Play store that is a trusted source for Android apps, many of which do not send any data whatsoever to Google or Facebook. As Cnet.com put it, “F-Droid is among the most scrutinized Play store alternatives we can advise.”
F-Droid has a good collection of apps, but is not meant for beginners. We recommend you investigate its offerings only after you have completed all the security and privacy steps in this guide, and are willing to venture outside the mainstream. Some of the privacy-focused services we have reviewed offer their apps in F-Droid, for example with Tutanota, a secure email service in Germany.
6. Maintain security by doing these things
By now, you’ve done a great job of securing your Android device. Here are some things you can do to keep it secure.
Keep notifications off the lock screen
The lock screen protects your device from snoops, since they need to know how to unlock it to do anything sneaky. However, Android can display app notifications on the lock screen. This is a convenience feature, as it lets you see important notifications at a glance, without having to unlock your device.
Unfortunately, anyone who happens to be looking can also see those notifications, even though your device is locked. Needless to say, this could turn into a real privacy issue.
Follow these steps to make sure that no notifications appear on the lock screen. The step-by-step instructions that follow are for my Samsung device running Android 10. The settings may appear in different locations on different devices.
- Tap Settings, then Lock screen.
- Scroll down the Lock screen screen to Notifications and set the slider to Off.
- There are a lot of options for exactly how notifications will be displayed on the lock screen, but you don’t need to worry about them. Just use the slider at the top of the screen to turn them Off altogether.
Note: You will want to confirm that lock screen notifications are still turned off any time you make any changes to the lock screen, just in case.
Minimize the number of new apps you install
This is a tough one. Now that you’ve spent some time eliminating excess apps, you have to avoid loading up all that space you freed up with a metric ton of new apps. Remember that every app on your device is a potential security and privacy problem.
Check app permissions before installing
If you do decide to install a new app, one of the first steps you take should be to check the permissions it requires. You don’t want to put find yourself in a position analogous to those people who installed flashlight apps that sent their contact info to some hacker in Uzbekistan. It is easy to check the permissions on an app from the Google Play store before downloading it. Here’s how:
- Find the app you are interested in on Google Play.
- Scroll down the page, past the reviews to the Additional Information section.
- Under Permissions, tap View Details. Google Play will list all the permissions requested by the app:
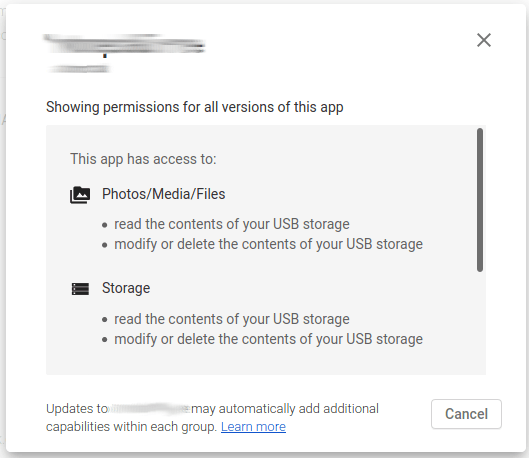
Review the permissions the app wants and be sure you are comfortable with them. If not, choose a similar app that doesn’t ask for the permissions you do not want to grant.
Update your software
Are you ever in a hurry to do something and decide to ignore Android’s request to do an update? Most of us do at one time or another.
However, this is a bad idea. Much of the endless stream of updates that hit our devices are security updates. If possible, just bite the bullet and update your device whenever it asks.
Stay out of bad neighborhoods
If you ever spent time in a big city, you were probably warned about certain “bad neighborhoods” that weren’t safe to enter. There are unsafe neighborhoods online too. While you won’t physically enter such neighborhoods, browsing them with your Android device is the online equivalent thereof.
Even if you’ve got the latest in antivirus software installed on your device, and it is locked down tight as a drum, hitting sketchy sites or the dark web could put your data at risk. Think about it this way. There is an ongoing war between the bad guys who want to steal your data or sabotage your device, and the good guys who protect your stuff.
The problem is that the bad guys are on the attack, and they make money exploiting people. They have an inherent advantage. If some creep figures out a new way to hack into your device there will probably be a period of time before someone develops a way to counter the new hack. If your device happens to get attacked during that vulnerable time, you are in trouble.
The best way to avoid this kind of tragedy is to avoid the bad neighborhoods online and use common sense.
Use a good VPN service on Android
A good VPN (virtual private network) is essential for Android privacy, security, and also unblocking websites. There are many reasons to use a VPN, as we’ve discussed in the ‘What is a VPN‘ guide. But here are three main factors explaining the growing popularity of VPN services:
- Internet providers are collecting your browsing data and handing this over to third parties (but a VPN will encrypt and conceal your activities). This is happening right now in the US, UK, Australia, and much of Europe.
- Public WiFi remains a serious threat with hackers targeting unsuspecting WiFi users with devices like this. (A VPN encrypts your connection and makes your data unreadable.)
- Many streaming services and websites restrict content to certain geographic locations. A VPN allows you to easily access your favorite content and bypass restrictions.
We just released a roundup guide of the best VPNs for Android based on our own testing.
Use a secure messaging service
A secure messaging service, or secure messenger, is a critical tool for private and secure communications. In most countries, it is safe to assume that Telecoms (and their spy partners) are recording all SMS message traffic. But don’t use any random messaging service. WhatsApp is now owned by Facebook, a notorious abuser of privacy and collector of private information.
Instead of regular SMS messages or WhatsApp, consider using one of these secure messenger services that we have reviewed and tested:
Replace the stock version of Android with one that doesn’t report everything you do to Google
For the ultimate in Android security and privacy, you could abandon Android altogether.
Android itself is an open source project. That means that other people can use the base Android code and create their own version of the operating system. The biggest benefit of doing that from our perspective is that the developers can modify the code to eliminate the bits that send your data to Google. Switching to an alternative Android distribution is not for the faint of heart, but it is the best way we know of to secure your Android data.
Here are a few different open source alternatives for the Android operating system that are more private:
- GrapheneOS – This is one of the best options for an open source Android operating system that offers a higher level of privacy and security. Right now, only Pixel phones meet the hardware requirements for this OS. Learn more about GrapheneOS here.
- CalyxOS – This is another great open source alternative that is hardened for more privacy and security. It currently supports Pixel phones as well as the Xiaomi Mi A2 phone. Learn more about CalyxOS here.
Note: Check out our Alternatives to Google Products guide for more options.
Conclusion on Android and privacy
As you can see, there are many tweaks and adjustments you can do to make Android a more secure and private operating system. If you worked your way through this entire guide, your Android device will be more secure with an enhanced level of privacy.
While this guide was mainly focused on increasing your privacy with Android modifications, there are other steps you can take to boost your online privacy in other areas as well. For example, a good VPN service will encrypt internet traffic between your device and a VPN server, while also hiding your IP address and location. We cover the best VPNs in detail on this site. There are also other privacy tools worth considering as well, including secure email, secure browsers, private search engines, and much more.
We also have a Windows privacy guide with step-by-step tweaks and modifications, like above.
Do you have any thoughts on Android privacy? Feel free to drop a comment below.
This Android privacy guide was last updated on January 29, 2025.

LEAP Encryption Access Project (https://leap.se) is a FOSS org that built a VPN (the architecture) which is deployed by Riseup as a multiplatform VPN called RiseupVPN and as CalyxVPN, by the makers of CalyxOS, for Android phones. Any Android user can use CalyxVPN, not just those users with CalyxOS installed.
I discovered this through the CalyxVPN page on f-droid (https://f-droid.org/en/packages/org.calyxinstitute.vpn/) and was skeptical because I had never heard of it and it just seemed too good to be true: it is free to use, it apparently integrates some censorship-bypassing features of TOR, and does not require an account, i.e. it’s anonymous. Can you please review it CalyxVPN and/or LEAP VPN?
https://f-droid.org/repo/org.calyxinstitute.vpn/en-US/phoneScreenshots/screenshot-04.png info on the software source
Hey Gordon, we’ll look into it, but no guarantees on a review. Thanks