
Imagine surfing the web, streaming your favorite shows, and downloading files without worrying about hackers, censorship, or geo-restrictions. This can be your reality with the best VPN for Windows on your PC in 2026. Let’s explore the top options to help you find the perfect fit for your needs.
We took the guesswork out of the equation by testing dozens of popular VPNs for Windows and ranking the top providers. This guide highlights the four best VPN services for Windows. While each of them offers a unique mix of features and performance, they are all reliable, secure, and private. You can't go wrong choosing any one of them.
If you haven't been using a VPN with your Windows PC, now is the time to start. The risks to your privacy are high when internet service providers log everything you do online and share this information with a wide network of third parties. Every week we hear news stories about hackers exploiting networks and computers around the world.
But the benefits are great, too, particularly if you want to enjoy streaming content available around the world and unblocking websites. The recommended VPNs we cover here can free you from the risks and give you access to the benefits.
Ranking the best VPNs for Windows PC
- NordVPN – Best VPN for Windows PCs and laptops with the fastest speeds, secure apps, and lots of extra security features (with a 70% off coupon)
- Surfshark – A secure and affordable VPN for Windows
- ExpressVPN – User-friendly VPN for Windows
- VPN.ac – Reliable Windows VPN
All of our recommended Windows VPN services meet these criteria:
- Passed all tests with no data leaks found (no IP address leaks or DNS leaks)
- Good performance throughout the server network (speed and reliability)
- High-quality Windows VPN apps with all features working correctly (including a kill switch)
- Supports secure VPN protocols and strong encryption standards
- Offers a money-back guarantee
- Trustworthy and well-established VPN provider with a good track record
- Located in a safe privacy jurisdiction (outside of Five Eyes countries, such as the US and UK) to keep your data safe
Now let's check out the top performers.
Here are the best VPN services for Windows:
NordVPN – Best Overall Windows VPN
| Website | NordVPN.com |
| Based in | Panama |
| Logs | No logs (audited) |
| Price | $3.39/mo. |
| Support | 24/7 live chat |
| Refund | 30 days |
| Deal | 74% Off Coupon |
NordVPN’s reputation as the best overall Windows VPN is well-deserved. It offers a huge number of advanced features for security, privacy, and performance. Our testing confirmed that its cutting-edge encryption and security measures, such as the NordLynx tunneling protocol and Threat Protection tool, provide Windows users with the ultimate protection against threats. Its performance is enhanced by its incredible network of 7,159 RAM-only servers spread across 118 countries.
NordVPN not only delivers impressive features and performance, but it also has a great Windows app that is packed with features. Tap the Quick Connect button to instantly connect to the best VPN server available.
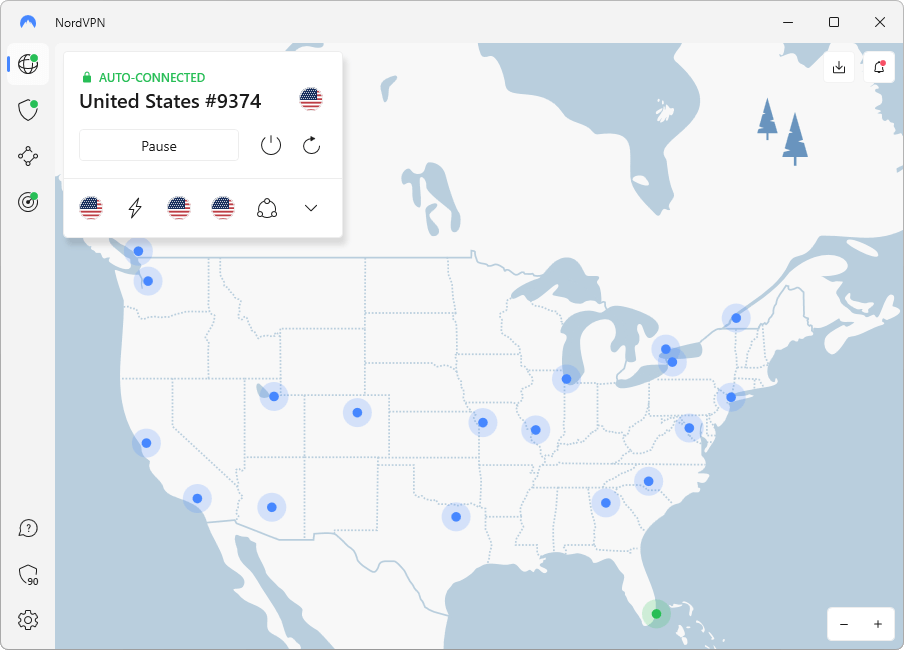
You can also set NordVPN to launch when you start your Windows device or to launch whenever you connect to a WiFi hotspot, shielding you from the dangers of public WiFi services.
NordVPN has a strong no-logs policy which has been verified by multiple third-party audits. Their ongoing security audit partnership with Versprite and a public Bug Bounty program help ensure that they maintain the strongest security standards for your protection.
If your concern is privacy while using your Windows computer, NordVPN has lots to offer:
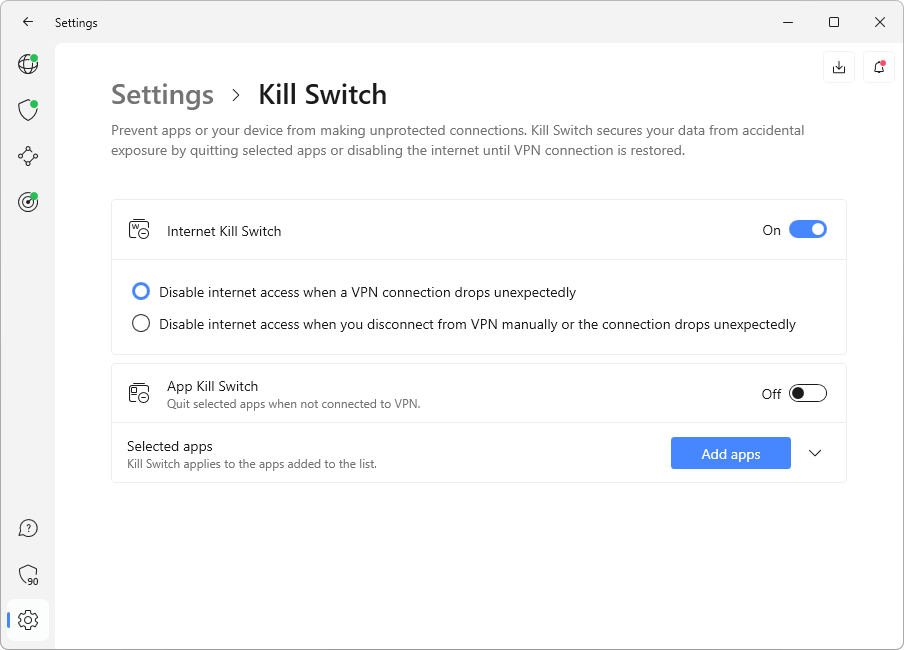
- 2 types of Kill switch – The kill switches prevent connections to the internet if the VPN connection drops for some reason. The NordVPN Windows app has both an internet kill switch which can block all traffic, and an App kill switch which quits the apps you select if the connection drops. See our VPN kill switch guide for more information.
- Double VPN servers – Encrypting your traffic across two separate VPN servers provides an extra layer of security for your data. (Our multi-hop VPN guide breaks down all the benefits of this powerful feature.)
- Onion Over VPN servers – The Tor network provides a layer of anonymity for its users. NordVPN's Onion Over VPN servers exit onto the Tor network allowing you to benefit from Tor's anonymity.
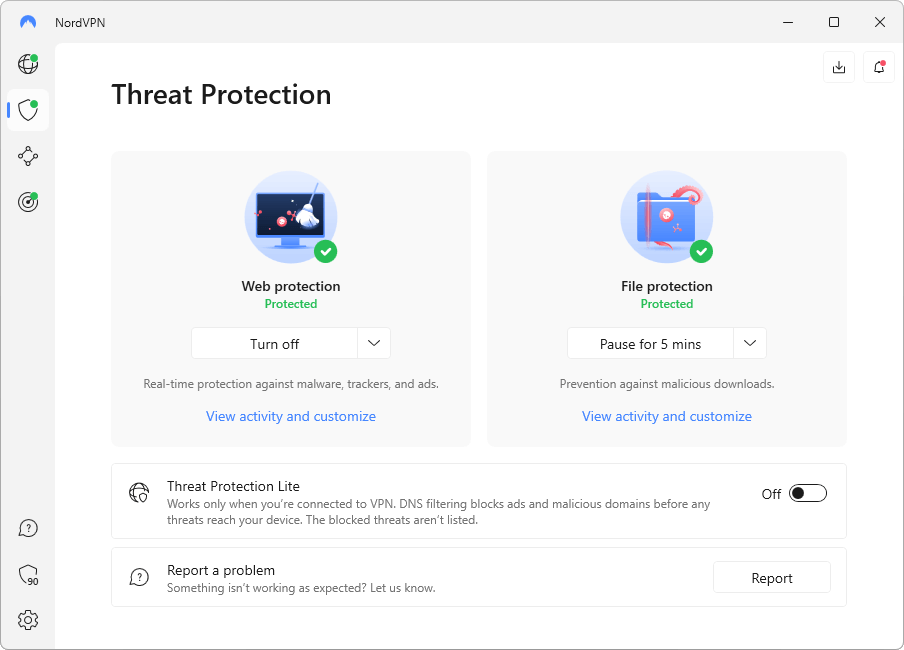
- Threat Protection – Ads, trackers, and malware domains are all security risks that also slow down your browsing and waste bandwidth. NordVPN's Threat Protection blocks them all, making your Windows PC VPN connection faster and safer. This is a VPN ad blocker on steroids.
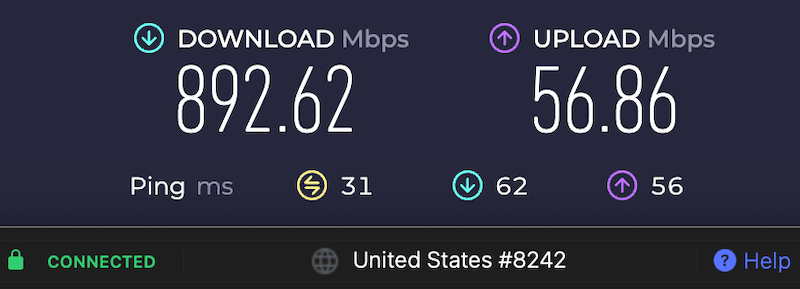
- NordLynx – NordLynx is NordVPN's custom implementation of the WireGuard VPN protocol. NordLynx enhances the privacy of WireGuard, allowing NordVPN users to enjoy the excellent security and extremely fast connections of WireGuard without compromising their privacy. We recently recorded a download speed of 892 Mbps with NordVPN using NordLynx.
- Obfuscated servers – If you find yourself in a place where normal access to VPN services is blocked, NordVPN's obfuscated servers disguise your VPN traffic to make it invisible to censors.
- Dedicated IP servers – Get the benefits of a static IP address dedicated to your sole use, along with the privacy and security benefits of NordVPN. NordVPN is one of the best dedicated IP VPN services.
- P2P servers – These servers are optimized for torrenting and other P2P activities, giving you high upload and download speeds along with excellent security.
See all NordVPN features here >>
Are you a streaming media fan? If so, NordVPN is a great choice. It unblocks 17+ Netflix libraries around the world. With excellent connection speeds, NordVPN won the top spot in our search for the best VPN for torrenting, making it a great choice for any file sharing activity.
NordVPN consistently outperforms other VPN services, even those that also support WireGuard. For example, you can see in the NordVPN vs CyberGhost comparison that NordVPN was faster in every server location tested. For Windows users craving speed and reliability, NordVPN is the best option.
NordVPN offers a full 30-day money-back guarantee and 24/7 live chat support directly through their website. It is also one of the best values in the world of Windows VPNs, costing only $3.30 per month when you use the coupon below.
+ Pros
- User-friendly and reliable apps
- Double VPN and Onion Over VPN servers
- Passed numerous 3rd-party audits
- Strong encryption standards with full support for WireGuard
- Works with Netflix and many streaming sites
- Threat Protection feature to block ads, trackers, and malware
- Professional 24/7 live chat support
- Consistently fast speeds
- Dedicated RAM-only servers with 10 Gbps bandwidth channels
- Post-quantum encryption
– Cons
- Best discounts only available with 2-year plans
To summarize, NordVPN is one of the best values in the world of Windows VPNs, and a great choice for any Windows PC user. With all the benefits shown above, plus a full 30-day money-back guarantee and 24/7 live chat support directly through their website, you can still get NordVPN at a cheap VPN price of $3.30 per month when you use the coupon below.
NordVPN's Cyber Deal is live:
Get 74% Off NordVPN two-year plans with the coupon below:
(Coupon is applied automatically; 30-day money-back guarantee.)
See the NordVPN review for test results and more info.
Surfshark – Best Budget-Friendly VPN for Windows Computers
| Website | Surfshark.com |
| Based in | The Netherlands |
| Logs | No logs (audited) |
| Price | $1.99/mo. |
| Support | 24/7 live chat |
| Refund | 30 days |
| Deal | 87% Off Coupon |
Surfshark is another secure, fully-featured Windows VPN that you should consider. Based in the British Virgin Islands, this VPN offers outstanding features and unlimited connections for a very cheap price. Surfshark is one of the cheapest VPN services on the market and is a great overall value.
The Surfshark app is designed with user-friendliness in mind, offering one-click connections and an intuitive interface that makes it easy for Windows users to navigate. And with unlimited simultaneous connections, you can securely connect all your devices without breaking the bank.
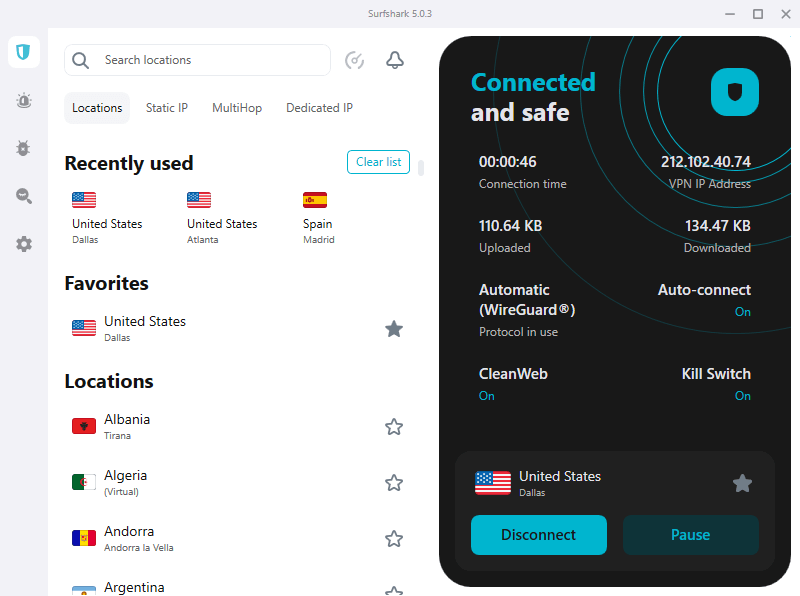
This budget-friendly Windows VPN offers a multitude of features, such as:
- High-speed connections – The WireGuard protocol gives Surfshark both high-speed and high-security
- Double NAT system – Boosts the privacy of WireGuard to no-logs level.
- Audited no-logs policy – For protection even against servers being seized.
- Kill switch – To prevent data leaks if the VPN connection fails.
- Smart DNS – Ensures that your ISP cannot spy on your activities.
- MultiHop (Double-VPN) servers – Encrypting your traffic across two separate VPN servers provides an extra layer of security for your data.
- Static IP servers – Let you have the same IP address every time you log onto the server. This address is shared with other users.
- Dedicated IP servers – These are Static IP servers that you do not share with other users.
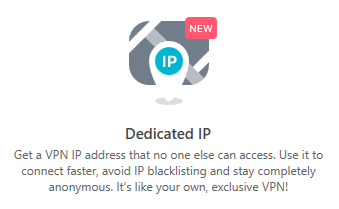
- CleanWeb – Surfshark's feature that blocks ads, trackers, and malicious domains (similar to NordVPN's CyberSec).
- Camouflage mode – Surfshark's version of obfuscated servers that conceals VPN traffic as regular HTTPS encryption.
- WhiteLister – Gives you control over which Internet traffic passes through the VPN tunnel (also known as split tunneling).
- Surfshark One – Enhanced version of Surfshark with antivirus capabilities, an unbiased search engine, and data breach monitoring.
See all Surfshark VPN features here >>

Surfshark is a friendly option for anyone who likes streaming video or torrenting. They support all major streaming services, including several Netflix regional libraries. It is also a great VPN for Hulu, BBC iPlayer, Amazon Prime, and many other streaming options. Torrenting is allowed on all Surfshark servers and Surfshark offers a dedicated Amazon app if you want to use a VPN on Firestick.
Surfshark offers great speeds on most servers and even outperforms other market leaders, as you can see in this Surfshark vs ExpressVPN comparison. Surfshark's performance is bolstered with full support for the WireGuard VPN protocol and a large network of fast servers. They currently have 3,200+ servers in 100 countries around the world.
Both NordVPN and Surfshark have now implemented full RAM-disk servers for a higher level of security. And similar to NordVPN, Surfshark supports a wide range of VPN protocols, including OpenVPN, IKEv2, and WireGuard. In our WireGuard vs OpenVPN speed tests, we found WireGuard to be about 57% faster than OpenVPN, which helps account for the excellent performance of this VPN service.
+ Pros
- Unlimited connections
- User-friendly apps for all devices and operating systems
- CleanWeb feature to block ads, trackers, and malware
- Works great with Netflix and many other streaming services
- 24/7 live chat support
- Strong encryption and security features (audited)
– Cons
- Limited support for VPN routers
- Above-average monthly prices
Wrapping up this section, Surfshark gives you high performance, advanced options, unlimited simultaneous connections, 24/7 live chat support, and a 30-day money-back guarantee. Use the coupon below to give this one a test drive at the lowest price possible.
Surfshark VPN Coupon:
Get 87% off Surfshark VPN plus an additional 3 months extra with the coupon below:
(Coupon is applied automatically; 30 day money-back guarantee)
Check out our Surfshark review for more info and test results.
ExpressVPN – Best User-Friendly VPN for Windows
| Website | ExpressVPN.com |
| Based in | British Virgin Islands |
| Logs | No logs (audited) |
| Price | $2.44/mo. |
| Support | 24/7 live chat |
| Refund | 30 days |
| Deal | 81% Off Coupon |

Next up in our discussion of the best VPNs for Windows is ExpressVPN. If your priority is a user-friendly VPN experience, we recommend you look no further than ExpressVPN. This top-rated Windows VPN offers:
An intuitive interface
Fast connections
Top-notch security features
A functional kill switch
MediaStreamer (ExpressVPN-branded Smart DNS)
Threat Manager to combat online threats
A router applet
See all ExpressVPN features here >>
The service is based in the British Virgin Islands, a great privacy jurisdiction with no mandatory data retention laws. ExpressVPN is a verified no-logs VPN provider that has passed independent security and privacy audits. It offers strong encryption and secure applications for your Windows PC and numerous other devices. ExpressVPN apps have built-in leak protection, split tunneling, and a kill switch feature called Network Lock.
If you are looking to access international media, such as sports, movies, or TV shows, ExpressVPN is a great choice. ExpressVPN is one of the best VPNs for Netflix and consistently works well without issues.
Like with NordVPN and Surfshark, ExpressVPN runs all servers in a volatile RAM-disk to improve data security. The ExpressVPN Windows VPN app is extremely easy to use and supports the OpenVPN, IPsec, and Lightway protocols. Lightway is a new, ExpressVPN-developed protocol that has many similarities to WireGuard.
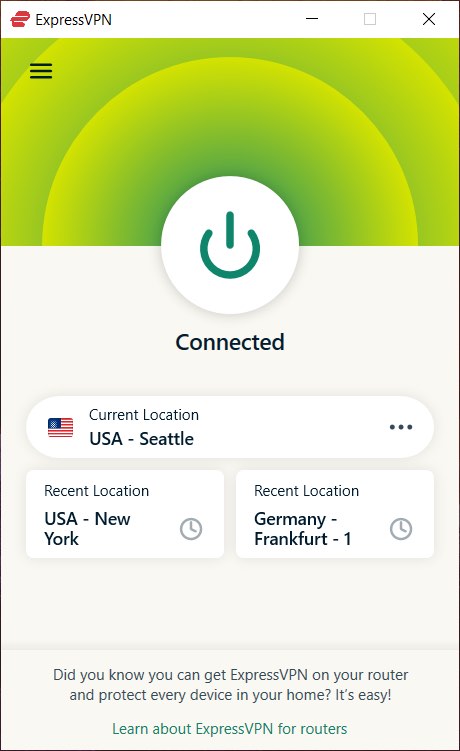
Need support? ExpressVPN offers 24/7 live chat assistance directly through their website. All ExpressVPN subscription plans come with a 30 day no-questions-asked money back guarantee.
+ Pros
- User-friendly and secure apps for virtually any operating system or device
- Proprietary Lightway VPN protocol for advanced performance
- Post-quantum version of the WireGuard protocol for enhanced privacy and security
- Split tunneling feature (for macOS, Windows, and routers)
- Works with Netflix and most streaming services
- 24/7 live chat support
- Passed independent third-party audits for security and no-logs
- Extensive network of diskless servers
– Cons
- Fewer features than other leading VPNs
The basic ExpressVPN feature set ensures a smooth and secure online experience. Plus, with a 30-day money-back warranty, and 24/7 live chat support, you can try ExpressVPN risk-free before committing to a subscription.
ExpressVPN Coupon:
Sign up for the 2-year plan and get 4 months added to your subscription for free.
(Coupon is applied automatically.)
See our ExpressVPN review for more information and analysis.
VPN.ac – Best Security-Focused VPN for Windows
| Name | VPN.ac |
| Location | Romania |
| Price | $3.75/mo. |
| Logs | No logs |
| Support | |
| Website | VPN.ac |

VPN.ac is another fast, secure Windows VPN. Created by a team of network security professionals, our extensive testing found the service to perform exceptionally well in terms of speed and security. VPN.ac is based in Romania, a good privacy jurisdiction.
VPN.ac offers an array of features including double-VPN servers, multiple encryption protocols, built-in leak protection, and secure browser extensions for Firefox, Chrome, and Chromium. It has a lineup of obfuscated servers to bypass VPN blocks, making it a strong choice where VPNs are restricted, such as schools and workplaces. Need a VPN for UAE? VPN.ac could be your answer there or anywhere the government tries to control internet access. And for maximal performance and security, VPN.ac exclusively operates bare-metal servers.
VPN.ac isn't as good as our other Windows VPN recommendations when it comes to unblocking streaming services, but it does usually work with US Netflix. However, it's not a reliable VPN for Amazon Prime or BBC iPlayer at this time. Overall, VPN.ac is more focused on privacy and security than streaming services.
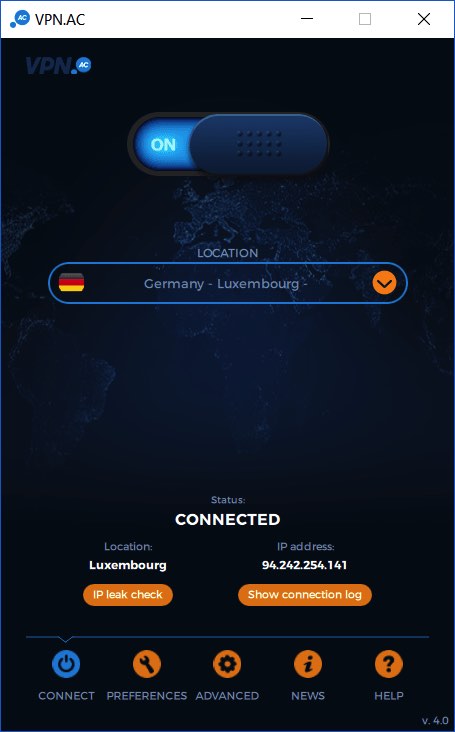
Whether you are using a VPN on Windows or you need a VPN for Mac OS, VPN.ac offers polished, secure, and reliable apps. Below is the Windows VPN app we tested.
+ Pros
- Dedicated bare-metal servers with self-hosted encrypted DNS
- Excellent speeds with plenty of available bandwidth
- Multi-hop (double VPN) server configurations
- Obfuscation features with many different encryption options
- Secure proxy browser extensions
- WireGuard VPN support
Cons
- Does not work well for streaming
- Fewer features than other leading VPNs
- Limited refund window (7 days)
Discounted trial: You can get a discounted one-week trial for only $2.00 (see the FAQ page).
See the VPN.ac review for detailed test results and analysis.
Why Windows users need a good VPN
In our increasingly digital world, every Windows user needs a robust VPN. VPNs play a crucial role in unlocking global content, particularly for those working or streaming media from home. But, choosing the best VPN from a myriad of available options can be daunting.
The internet, while a powerful tool, is fraught with risks. Despite having a secure PC and the latest antivirus software, a VPN is indispensable to fully protect your online activities. This is because, while your PC might be secure, its connection to the internet isn't as safe. Built on protocols that didn't foresee the advent of sophisticated cyber threats, the internet remains vulnerable to hackers and other threats. This is where a strong VPN service steps in.
A robust VPN forms an encrypted connection, or a “tunnel”, between your Windows PC and online resources such as websites or streaming services. The VPN gives you both security and privacy. It encrypts your online communication, preventing outsiders from snooping (security), and simultaneously masks your PC's identity and location (privacy), helping dodge online tracking.
Moreover, VPNs can simulate your physical presence in different parts of the world, granting access to geographically restricted content. In essence, a VPN does more than just hide your IP address.
What can your ISP see if you don't use a VPN on Windows?
Using a VPN is essential to keep your online activities private and secure. Internet service providers (ISPs) and mobile carriers can easily record your data and see every website you visit. The usage of this data varies based on your geographical location. For instance, in countries like Australia, ISPs retain your connection data for two years in case someone from the government wants access to it for some reason.
In the US, it's legal for ISPs to collect your data and sell it without your permission. This practice has been legitimate since 2017. ISPs can monitor the websites you visit by looking at the DNS requests your computer sends when it needs to translate a website’s URL to an IP address. These requests are usually logged by your ISP.
However, with the leading Windows VPNs, your DNS requests are fully encrypted, making them incomprehensible to your ISP, and are handled by the VPN’s DNS servers. The ISP can only identify that you're using a VPN service, but they can't see what you're doing beyond that.
The Windows VPNs we recommend all have their own DNS servers and encrypt DNS requests in the VPN tunnel. Additionally, the VPN replaces your IP address and location with the VPN server’s IP address and location before sending your request out to the Internet at large. This way, even if someone was watching all the VPN's servers, they still wouldn't be able to tell what you are up to.
This diagram shows basically how a VPN protects your data from nosy third parties:

As you can see in the diagram, the strong encryption applied to your internet traffic and online activities by the VPN service makes them unreadable to third parties.
Are Windows VPNs legal?
We are not lawyers, so do not consider what follows as legal advice.
In general, the answer is yes, it is perfectly legal (and normal!) to use virtual private networks (VPNs), even if you are in a place like China where VPNs are restricted. VPNs are used every day by businesses and individuals throughout the world. Businesses in particular rely on VPN technology and it would not make sense for this to ever become illegal.
That being said, some countries such as China ban non-approved VPN services that do not go along with state censorship requirements, as explained in the China VPN guide. The United Arab Emirates and a few other Gulf State countries also have laws against people using VPNs to evade state censorship. But elsewhere in the world VPNs remain a safe, legal, and popular tool.
Is it safe to use a VPN for Windows?
If you are using a good, reputable VPN service that effectively secures your traffic like the ones we review here, then yes, a Windows PC VPN is safe to use. That said, even the best VPN service has its limits. If you are up to something that will annoy a powerful opponent like the CIA or other national intelligence agencies, all bets are off. See our guide on how to be anonymous online.
But is anything completely safe these days? Even public WiFi carries risks, which can be mitigated by encrypting your traffic with a good Windows VPN.
Why you should not use a VPN based in your own country
VPNs must follow the legal regulations of their host countries. For example, a US citizen using a US-based VPN is vulnerable to local law enforcement due to VPN's legal obligations. However, an offshore VPN isn't subject to U.S. laws and may even be legally barred from sharing information, offering superior safety.
If you're an American using a VPN located in the US, it falls under American law. So, if a US attorney has a legal judgment against you, they can compel the VPN to share any relevant information about you.
However, if your VPN is based internationally, it isn't obligated to comply with US legal demands. In some instances, it might even be against the law for them to do so in their home country. To extract information from such a VPN, the US attorney would have to sue and win in the VPN's home country.
In most situations, this just isn't practical, making you safer when you don't use a VPN based in your own country.
How do I set up a VPN on Windows?
The exact steps for setting up a Windows PC VPN will vary from vendor to vendor, but at the most basic level, the process looks like this:
- Purchase one of our recommended VPN services for Windows using our discount link for the best savings.
- Download the VPN service's Windows app.
- Find the VPN app file in your Downloads folder and double-click it.
- Run the installer, replying to any questions it may ask you along the way.
- Launch the Windows PC VPN app.
- In the app window, choose the VPN server you want to use and click Connect. The NordVPN app gives you a Quick Connect button that automatically selects the best server for your specific area. Most VPN apps have something similar.
- After a moment, the app will indicate that you are connected to the server and your Internet connection is now protected.
Using a VPN to stream TV and sports on Windows from anywhere in the world
Certain international TV and sports platforms online are often geo-blocked due to commercial and legal considerations, limiting their accessibility to specific geographical locations. This restriction is determined by checking your computer's IP address when attempting to access these platforms.
VPN services have servers located all around the world. Each of these servers has an IP address that corresponds to its physical location. By connecting to a VPN server that is located in an unblocked physical location, you can get access to content that would otherwise be off-limits. Of course, you may still need an account to log into a service, but there are still lots of legitimate situations where this capability can come in handy.
Imagine that you are traveling during a major sports event. While your destination might be geo-blocked, using a VPN like NordVPN or other recommended Windows PC VPNs can help. By logging into a VPN server that isn't geo-blocked and then accessing the streaming service, you can watch the event as if you were at home.
This feature also allows you to access content outside your usual location. For instance, if you're in the USA and want to learn Spanish, you can connect to a VPN server in Spain or Mexico and watch Spanish-language content. Or, get the Australian viewpoint on US/China trade affairs by connecting to a server in Australia. A VPN transforms you into a virtual global traveler, a valuable asset in today's world riddled with restrictions.
Conclusion: Use a good VPN for Windows in 2026 to stay safe online
In a world of threats, dangers, and geo-restricted content, a VPN is a must-have tool for Windows users. And with growing content blocks around the world, we can expect VPNs to continue to grow in popularity.
Our top recommendation remains NordVPN, followed closely by Surfshark, another top contender.
NordVPN's Cyber Deal is live:
Get 74% Off NordVPN two-year plans with the coupon below:
(Coupon is applied automatically; 30-day money-back guarantee.)
There you have it. These excellent Windows PC VPNs can boost your online security and privacy while giving you access to the best Internet resources from around the world. But the information we've provided here only summarizes what each of these great products can do. We urge you to read the descriptions here, then follow the included links to get our detailed reviews of the VPNs that look most interesting to you, or go right on to the website.
Every VPN we recommend offers a money-back guarantee between 7 and 30 days, essentially acting as a free trial VPN if you cancel.
We're confident that one of these five will turn out to be the best Windows VPN service for you. And if you are on a tight budget, you may want to consider these VPN coupons for additional savings.


Leave a Reply